Playing Solo Chapter 5: Combat Decision-Making
Choosing the fight before the fight chooses you in Arena Breakout: Infinite (ABI). Learn proper observe/think/execute phases, flanker containment, utility timing, and disengagement rules.
Most solo fights are decided before the first shot is fired. Aim matters, but aim is rarely enough by itself. If you enter a fight from a bad position, against multiple enemies, with poor information, and no escape route, mechanical skill becomes the only thing left to save you. That is not where a solo player wants to be.
A squad can survive mistakes through numbers. If one player overextends, another can trade. If one player gets hurt, another can cover. If one player loses track of you, another may still have vision. A solo operator does not have that safety net.
This means your goal is not to take every fight. Your goal is to take fights that are already shaped in your favor.
A good solo player does not ask, “Can I kill them?” They ask, “Can I kill them and still survive what happens next?”
Observe, Think, Execute
When you see an enemy who has not noticed you, do not shoot immediately just because you can. Seeing the enemy first is an advantage, but wasting that advantage too early can turn a good position into a bad fight.
Before engaging, split the decision into three phases: observe, think, and execute.
Observe first. Look at the enemy’s gear, movement, direction, and behavior. Are they alone, or are more players following behind? Are they looting, rotating, fighting AI, or moving with purpose toward a point of interest? Are they separated from their team, or close enough to be supported immediately? Are they wearing gear your ammo can realistically deal with?
The goal of observing is to understand what kind of fight you are about to create.
Then think. Ask whether your current loadout can handle the situation. Your weapon may be strong at close range but weak at distance. Your ammo may be good enough for mid-tier armor but unreliable against high-tier armor. Your armor may already be damaged. Your position may give you the first shot, but not the second angle. If you shoot now, will you get a clean kill, or only reveal yourself?
This is where many players fail. They see an enemy and treat the moment as a test of aim. A solo player should treat it as a test of judgment.
Execute only when the decision is clear. If the fight is favorable, strike with purpose. If the enemy is about to move into better cover, you may need to act quickly. If they are walking into the open, waiting may give you a better shot. If you are not confident that you can handle the full situation, do not engage.
Letting an enemy pass is not a wasted opportunity. Sometimes it gives you more information, a safer angle, or a better fight later.
Avoid Fair Fights
A fair fight is a dangerous fight. Fair fights give the enemy time to react, communicate, heal, flank, and use their numbers. If you fight a squad on equal terms, you are usually accepting their advantage.
Your goal is not to prove that you can beat a team in a straight duel. Your goal is to make the fight unfair before it begins.
An unfair fight can be created in several ways. You can attack from an unexpected angle. You can wait until one player separates. You can let another team distract them first. You can shoot when they are looting, healing, crossing open ground, or focused on AI. You can reposition after the first shot and make them fight old information.
The best solo engagements usually begin when the enemy does not fully understand what is happening.
If a squad knows your exact position, has multiple angles on you, and is ready to push, you are no longer choosing the fight. You are surviving it. That does not mean the fight is impossible, but it does mean your advantage is already disappearing.
A solo player should constantly look for ways to reduce the enemy’s ability to respond.
Do not fight the squad as a squad. Fight one player, then disappear.
Punishing the Flanker
When a squad realises they are fighting a solo, one player will often try to flank. This is dangerous, but it is also an opportunity.
A flanker is temporarily separated from the group. They are usually focused on reaching a new position, not on being ambushed during the movement. If you identify the flank early, you can turn the squad’s numbers against them by forcing a clean 1v1 before the rest of the team can support him.
This is one of the most important solo concepts: squads create strength through numbers, but those numbers become weaker when they separate.
If you hear or see one player moving away from the main group, do not ignore it. Ask yourself whether you can intercept him safely. Is he crossing open space? Is he moving through vegetation? Is he trying to reach your side angle? Can you reposition before his teammates understand what is happening?
If the answer is yes, the flanker may be the best target.
Killing the flanker does more than remove one enemy. It damages the squad’s structure. The remaining players may become uncertain about your position, hesitate to push, or become distracted by the body. This gives you time to rotate, reload, heal, or prepare the next angle.
But do not chase a flanker blindly. If his movement is bait, or if his teammates already have sightlines on the route, you may be walking into a trap. Punish separation, not every sound of movement.
Controlled Aggression
Most of the time, a solo player should avoid reckless aggression. Pushing without information, wide-swinging into multiple enemies, or chasing wounded players too far will get you killed.
However, there are moments where sudden aggression is useful.
If a squad is confidently running you down, they may expect you to hide, heal, or keep retreating. A sudden swing, close-range challenge, or unexpected push can break their rhythm. The goal is not to become random for the sake of being random. The goal is to act at a moment when the enemy has already made an assumption about you.
Controlled aggression works because it interrupts expectation.
If the enemy thinks you are scared, a fast challenge may startle the first player. If they think you are still behind cover, a quick reposition and swing may catch them looking at the wrong angle. If they are pushing one by one, meeting the first player aggressively can turn their chase into an isolated fight.
This should not be your default answer. It is a tool for specific situations.
Use aggression when it creates space, punishes overconfidence, or gives you the first clean shot.
Do not use aggression because you are frustrated.
Using Utility in Combat
Utility should solve a problem before you expose yourself. A solo player should not throw grenades only because they have them. Each throw should create information, force movement, block vision, slow pressure, or make a fight easier to control.
Use stuns to check uncertain positions. If a stun hits an enemy, you hear a confirmation sound with a “dink”. This lets you check rooms, corners, cover, and tight angles without peeking blindly. Even if you do not push afterward, the information alone can give you more options.
Use lethal grenades to punish strong positions, damage armor, or force movement before you swing. Each lethal has a slightly different role.
M67 is the standard fragmentation option. It is good for damaging players behind cover, punishing exposed limbs, and forcing enemies to move before they are ready. It is a reliable general-purpose grenade when you want to weaken someone before swinging or make them abandon a position.
MK2 is especially useful against armor durability. A good throw can heavily damage enemy armor, which matters when fighting players in Tier 5 or Tier 6 gear. If your ammunition is only Tier 4, weakening their armor first can make the follow-up fight much more manageable.
GHO is useful when the enemy is hiding behind awkward cover or objects that can block normal fragmentation. Since it can damage through certain walls, cover, and objects, it is strong against players tucked behind desks, tables, furniture, or other positions where shrapnel may be unreliable. It is also useful for finishing downed players when direct line of sight is unsafe.
Use smoke to control sightlines. Smoke can cover a crossing, block a long angle, or let you loot an exposed body. Even after killing a squad, do not assume the area is safe. A third party may have heard the fight and rotated toward the noise. Smoking the body or the exposed angle can buy enough time to take value and leave.
Smoke can also isolate a fight. If two enemies are holding the same angle, placing smoke between them can block the farther player’s vision and force the closer enemy into a temporary 1v1. This is one of the strongest solo uses of smoke because it turns a shared angle into a separated fight.
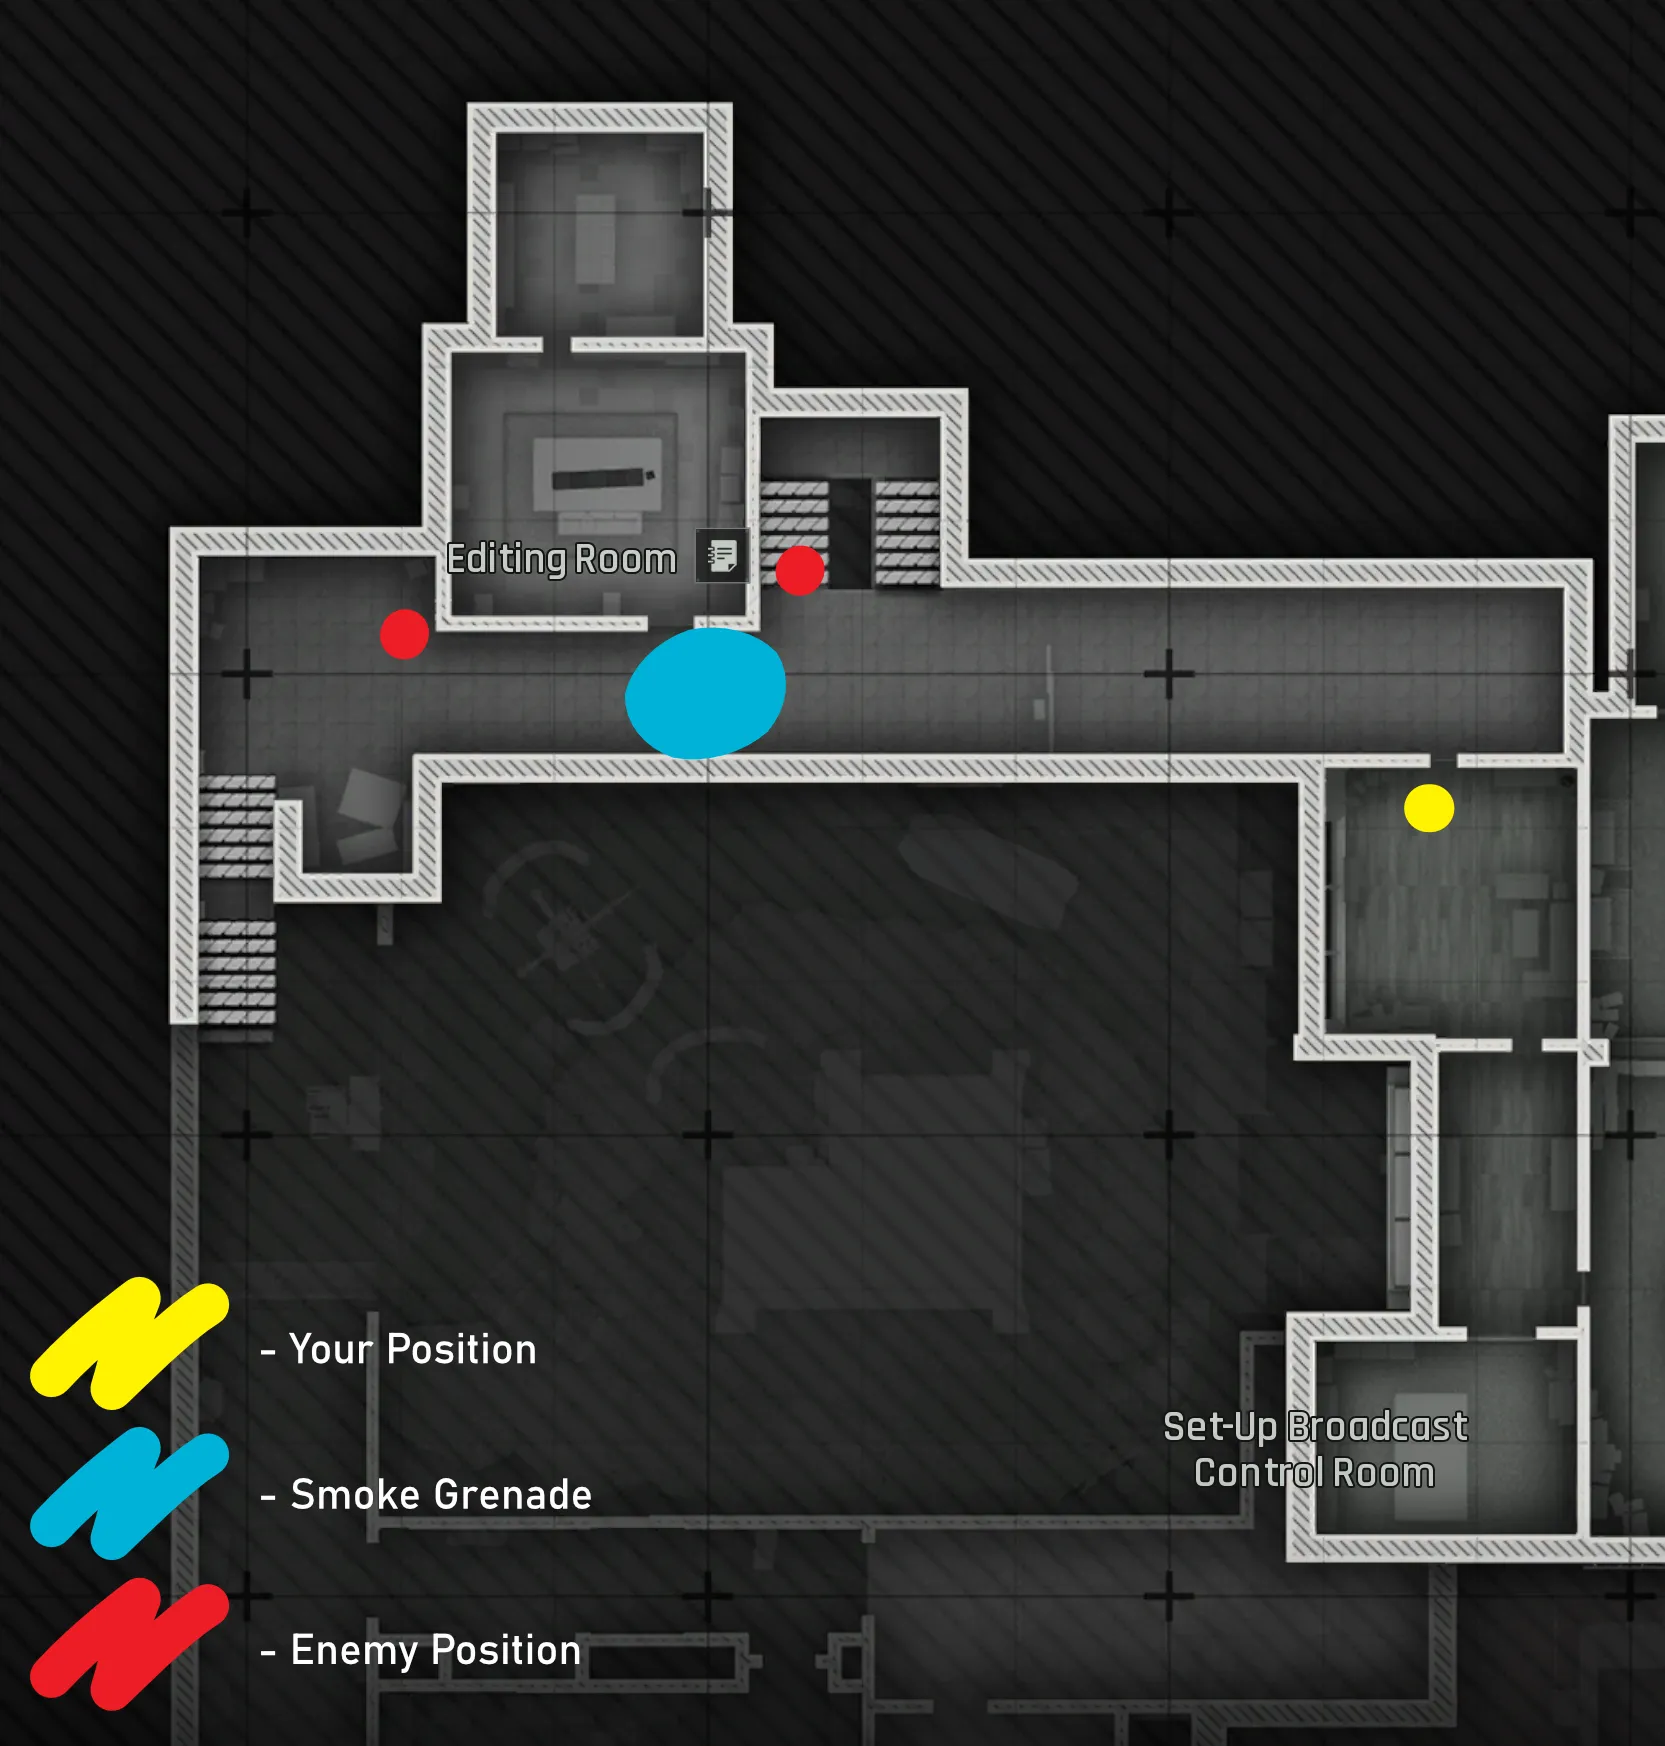
Smoke Map Routing. Use smoke to isolate fights, block sightlines, or cover dangerous crossings.
Smoke can also be used to attack a long angle. If a player is shooting at you from far away, throwing smoke close to their position can create temporary control over the area behind the smoke. They may still know your general direction, but they lose clear vision. This can let you reposition closer, cross a dangerous opening, or escape the angle entirely.
Use gas to slow pushes, deny space, and make enemy movement easier to read. Tear gas is especially useful when enemies are trying to collapse on your position through a doorway, hallway, staircase, or narrow route. Once they enter the gas, they begin coughing loudly, which makes it harder for them to move quietly or hide their timing.
Gas also applies a lingering effect that directly damages their chest, leaving them hanging on with at least one HP if the gas has taken the full effect. The longer someone stays inside the cloud, the longer they need to recover after leaving it. This makes gas useful for delaying a push even after the enemy steps out of the affected area. They may still be coughing, taking damage, or forced to wait before committing again.
Use gas when you need time. It can help you heal, reload, reposition, or stop a squad from rushing through one entrance together. Against aggressive teams, gas can break their tempo because it forces them to either wait, or push through the effect.
Remember that gas is not absolute safety. A player using a Nebulizer can move through and stand in the gas without consequences for a short time (30 seconds), and the Nebulizer can also clear the negative effect instantly. Because of this, gas should be treated as a deterrent, not a wall. It slows pressure, but it does not guarantee that no one can push through.
Use Molotovs to force immediate movement. Since they explode on impact, they are strong against players holding corners, doorways, small rooms, or tight cover. They can also finish downed players quickly or deny a revive. If the angle allows it, throwing a Molotov at the ceiling can spread fire below the impact point and pressure someone without needing a clean floor throw.
Use flashbangs as niche close-range timing tools. They can create a strong opening if the enemy is looking toward the detonation, but they are much less reliable than stuns for general use. A stun can still give you information through the hit confirmation sound. A flashbang usually needs better placement and better timing to create value.
The strength of a flashbang is its short fuse. Because it detonates quickly, it can be thrown around corners or into close angles with very little reaction time. If placed well, it can blind enemies harder than a stun and create enough time to swing, or force a kill.
The weakness is consistency. If the enemy is not looking toward the flash, turns away in time, or is positioned at an awkward angle, the effect may fail entirely. This makes flashbangs risky if you are depending on them as your only way to enter a fight.
Use flashbangs when you already have a good idea of where the enemy is and need a quick opening. Do not use them as your main information tool. If you are unsure whether someone is there, a stun is a safer option.
The Multi Flash works in a similar role, but it detonates multiple times. This can make players hesitate, delay a peek, or create confusion for a few seconds. It is useful when you want to make an enemy uncomfortable before moving, but it is still situational. Treat it as a disruption tool, not a guaranteed blind.
Reposition After Contact
Once you shoot, your position begins to lose value. The enemy now has information. They know the direction of fire, the approximate distance, and possibly your exact angle. If they are a squad, that information will spread quickly.
Staying in the same position after contact is one of the most common ways solos die.
After firing, ask yourself whether the position is still useful. Did you get the kill? Did they see your muzzle flash? Did they hear the shot clearly? Are they throwing grenades? Are they moving to flank? Can another team hear the fight?
If the enemy now understands your position, rotate before that information becomes accurate enough to kill you.
Repositioning does not always mean running far away. Sometimes moving a few meters changes the angle enough. Sometimes dropping behind cover and appearing from the other side is enough. Sometimes you need to leave the area completely.
The important thing is that staying still should be a choice, not a habit.
A solo player wins by making enemies react to outdated information. If they are aiming at where you were, you are already ahead of them.
A Kill Is Leverage
A kill should not be treated as immediate loot. It should be treated as leverage.
When you kill a member of a squad, the body becomes a point of pressure. His teammates may want to recover his equipment, hide his weapon, retrieve his armor, or punish you for staying nearby. This makes their next decision more predictable.
Predictable behavior is valuable.
Many players die because they get the first kill and immediately run to the body. That is usually the most dangerous thing you can do. The body attracts attention. It creates noise. It lowers your awareness. It places you exactly where the enemy expects you to be.
As a solo player, you should usually avoid looting immediately after the first kill. Instead, use the body. Watch it. Rotate around it. Force the squad to expose themselves if they want to recover their teammate’s gear.
The first kill gives you control only if you do not throw that control away.
Do not let the first kill become the reason you die.
Fighting Around the Body
Once a body is on the ground, the fight changes. The enemy team now has an emotional and practical reason to return to that position.
They may want revenge. They may want the gear. They may want to confirm whether you left. They may want to use the body as bait. All of these reactions can be used against them, but only if you stay disciplined.
Do not sit directly on the body. Instead, think of the body as a marker. Where would the teammate approach from? What cover would they use? What angle would they check first? Would they expect you to still be nearby, or would they assume you ran away?
Your job is to punish the recovery attempt without becoming predictable yourself.
Sometimes the best position is not watching the body directly, but watching the path toward it. Sometimes the best play is to rotate away and catch the enemy looking at the wrong angle. Sometimes the safest choice is to leave entirely because the fight has already created too much noise.
A body creates opportunity, but it also creates greed.
Use the opportunity. Avoid greed.
When to Disengage
Disengagement is one of the most important solo skills.
Many players know how to start fights, but fewer know how to leave them. This is why they win the first exchange and die shortly after. They stay too long, peek too much, chase too far, or keep trying to finish a fight that no longer benefits them.
A solo player should disengage when the fight stops being favorable.
If the enemy knows your exact position, leave the angle. If a second squad arrives, reassess immediately. If your armor is damaged, your ammo is low, or your meds are almost gone, continuing the fight may not be worth it. If you already have valuable loot, the reward for another kill may not justify the risk.
Disengaging does not always mean running away in panic. A good disengagement is controlled. Break line of sight. Use cover. Move perpendicular to the enemy’s expectation. Avoid obvious routes. Use sound, vegetation, terrain, or buildings to interrupt tracking.
Sometimes leaving the fight is what allows you to win it later.
If the enemy chases carelessly, they may separate. If they assume you left completely, they may begin looting. If they return to their teammate’s body, they may expose themselves. Disengagement can reset the fight and create a new opportunity.
The question is not whether you are brave enough to stay. The question is whether staying still gives you anything.
The Consequences of a Fight
Every fight changes the raid. Even if you win, your situation is not the same as before.
Your armor may be damaged. Your face shield may no longer be reliable. Your ammo count may be lower. Your grenades may be gone. Your meds may be reduced. Your position may be known. Your gunfire may have attracted other players. Your backpack may now be heavier. Your loot may now be valuable enough that extraction should become the priority.
This is why a solo player should reassess after every fight.
Do not survive one fight and immediately play as if nothing happened. Ask yourself what changed.
- Can I survive another fight in this condition?
- Is my armor still reliable?
- Do I still have enough ammunition?
- Did the fight make too much noise?
- Am I now carrying something worth extracting?
- Is it time to leave?
A successful fight can still become a failed raid if you ignore the consequences.
Common Combat Mistakes
Many solo players die because they win a small part of the fight and then lose discipline.
The first mistake is looting too early. A kill feels like a reward, but the body may still be contested. If you do not control the area, the loot is not yours yet.
The second mistake is repeating the same peek. Once the enemy has seen an angle, they will often pre-aim it, pre-fire it, or grenade it. If you have another option, use it.
The third mistake is chasing wounded enemies too far. A hurt player running away may be bait, or may simply lead you into his teammates. Damage is useful, but survival matters more than finishing every target.
The fourth mistake is fighting from positions with no exit. A room with one door may feel safe until the enemy throws grenades or holds the only way out.
The fifth mistake is staying after the fight has already been won. If you killed one player, took useful gear, and created pressure, you do not always need to finish the entire squad. Sometimes you already gained enough value.
The final mistake is fighting because of emotion. Revenge, frustration, greed, and boredom all create bad decisions. A solo player should fight because the fight makes sense.
Keep Reading the Guide
Controlling what the enemy knows is how you win raids in Arena Breakout: Infinite (ABI). Learn proper noise control, visual vs solid cover, exit planning, and positional tactics.
Next ChapterChapter 6: Looting Under PressureTurning survival into profit without losing control in Arena Breakout: Infinite (ABI). Learn looting order, value-per-slot calculation, backpack management, weight penalties, and armor swaps.