The Ultimate Melee-Only Mode Guide
Master the high-stakes Melee-Only mode in Arena Breakout: Infinite (ABI). Learn how the game mode works, spawn positions, weapon categories, and survival strategies.
In the following guide you will learn how melee-only works, how to play it, and how to survive in Arena Breakout: Infinite (ABI). As a player with a vast amount of hours and experience in this game mode, I see a lot of newer players trying it out and giving up after being eliminated constantly by more experienced players. To stop this from happening, I'll give you insights on how to play it properly and bring you the opportunity to enjoy it as much as I do.
What is Melee-Only?
This game mode’s entry fee is 150k Koen with Forbidden level loot, and it consists of you and 7 other enemy players spawning in the area of Northridge Hotel with no access to your secure container or your keychain. (To obtain a permanent secure container, unlock the 3x3 container first using our 3x3 Missions Guide). At the start of the raid, everyone is equipped with the following: RAP simple rig, M32 headset, Sports backpack, 2 E-drinks, 1 400D medkit, and 1 standard surgical kit, as well as 2 stimulant injections which give you infinite endurance, strength, regeneration, and painkiller effects.
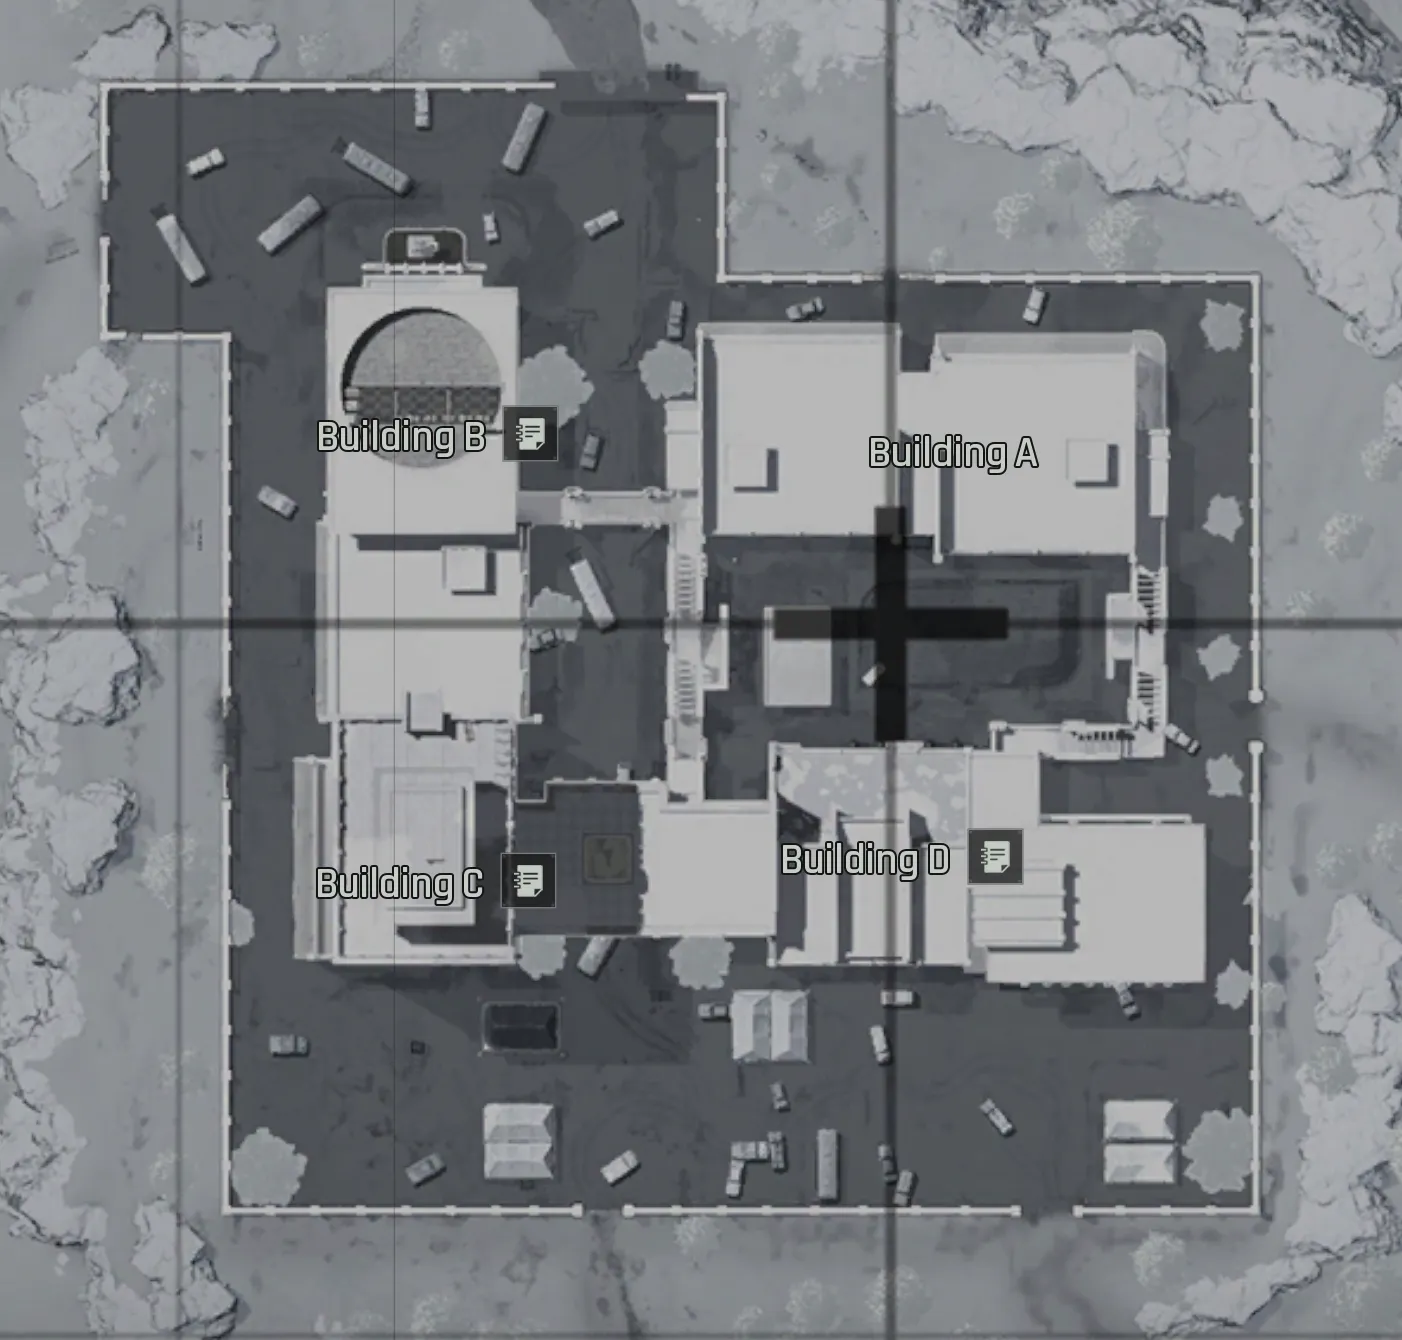
To guarantee that you will keep anything of value, you must get an elimination to gain access to the retrieval container. The map has 2: one on the second floor level in the staircase between building B and C, and one by the stairs of the pool on the opposite side of the map.
In this game mode, a boss can spawn. He is confined to the pool room and is not able to leave under any circumstance. He is equipped with his own personal melee weapon that can deal great amounts of damage. This boss carries a GS2 headset and a large camping backpack containing various miscellaneous items and a guaranteed universal keycard.
When it comes to extracting, there are two available extraction points. One is in the same place as the hotel dog tag extract in normal Northridge, and the second one is at the main gate, which can only be activated 10 minutes after the raid starts by pulling a lever (similar to the TV Station Main area extraction point). Starting this extraction sends a notification to everyone on the map and takes a whole two minutes to get you out of the raid.
After 5 minutes in the raid, you will be able to hear an airplane pass by the area; it drops an airdrop in the swimming pool. This airdrop has 4 searchable containers: 2 red ones and 2 yellow ones. The red ones yield 1 rig (Hunter rig, B4 rig, or FA multi) and 1 backpack (Large camping, Medfield, or Chapman). The yellow ones each contain 1 single item of purple quality or better.
How to Play Melee-Only
As most people know, the melee weapon you select before joining this game mode has a great impact on how you play it and what you can do in order to survive. They all have different attack patterns and ranges. Regardless of this, every knife except the default one will one-tap to the head. Here are the different knives categorized by their range:
- Long Range: Arasaka Spec Ops Blade, Winter Festival Ice Pick, Crimson Furnace, Gilded Shadow, Reaper, Eternally Forged, Errata.
- Short Range: Assault Dagger, Riptide Striker, Meteoric Claw, Red Kite Combat Knife, Clearing Blade, Neon Pulse, Sapper Shovel, Berserker Double Axe, Banishing Blade, Phantom Protocol Switchblade, Fangs of Cerberus.
You will have to always keep in mind the difference in category before fighting someone. Of course, you never know what the other player will do; they could run away, run towards you, or keep their distance.
Spawn Points and Hotspots
At the start of the raid, always prioritize using the stimulants given to you; they will make a big difference in what you can do. Below are the spawn locations that you and the enemies can get. Keep these in mind so you don't get pushed unexpectedly and die early in the raid.
Once every stim is used, if you survive your spawn, I recommend pushing one of the free safes, which are the hotspots of the map. There are four of them located at:
- Building B reception area
- Building C third floor directly on the center of the isle table
- Building D balcony
- Building A second floor in the room in front of the stairs
These spots most of the time guarantee a fight, which if won will give you access to the retrieval box, as well as the loot in the safe. Always collect the dogtags of any eliminated player even if it's not your kill, as it will help you know that you are alone in the lobby once you obtain 7. After this is done, there are two ways to play it: aggressively or passively.
Key Combat Techniques
- Jumping: Jumping while in a fight can help you survive or deal the finishing blow to your enemies. By jumping, you can evade being hit in the head since they will hit you mostly on your arms or torso thanks to the difference in height. Jumping is a critical part of this game mode.
- Grenade Cases: Grenade cases are scattered around the map. They have a chance to contain all types of grenades, from lethals to tacticals. A lethal grenade can be fatal since there is no armor to cover your body, so make sure to listen carefully for any grenade pins.
- High Ground: High ground will give you the advantage since enemies are most likely to hit your body rather than your head. The balcony of building C (accessible only by using a ladder or a crouch spot) is one of the most secure places on the map because people can't attack while climbing, and crouch spots put the climbing/crouching enemy at a disadvantage.
Playstyle Choices
Aggressive Playstyle: Your main focus is to clear the lobby as soon as possible. You run around the map looking for players to eliminate. Once you obtain enough items to cover your entry fee, put them in the retrieval container so you guarantee no losses if you get eliminated later.
Passive Playstyle: After ensuring a kill to lock in retrieval container access, you focus on the loot side. You kill scavs and check their rigs and backpacks for a universal keycard. You open rooms and try to put the best items possible in the retrieval box. Unless the last remaining players eliminate each other, you will still eventually have to fight, but you should still make a profit from the loot saved in the retrieval box.
Loot Guide
As mentioned previously, Melee-Only has Forbidden level loot: every container can have valuable goods from reds to golds to keys. You have enough time to loot everything in around 10 minutes if you know where all the containers are. But we all know that what we want is to hit the safes and get that precious red item. For that, you will need to make sure to eliminate scavs and search their bags and rigs.
- Universal Keycard: Will only spawn in the last item slot of the rig.
- Rig Check: If a rig has less than 4 items, a key won't be possible. If there are 4 items but the first item is a bandage or consumable, there won't be a key either.
- Backpacks: Scavs will carry either a lightweight camping backpack or a medium camping backpack.
As a personal recommendation, search the areas you pass by as you make your way to the key room you plan on hitting if the lobby is clear. Melee-Only has more searchables scattered around the map, ensuring you get as much loot as possible. Suitcases, document boxes, and jackets of any kind are the best options to search as they have the chance to contain reds and keys inside.
Regarding the extraction point you plan on taking, you should always start running to it 30 to 40 seconds before the minimum time to leave. For example, when there is 2 minutes and 40 seconds left, you should run to the main extract. For the dog tag extract, make sure to run with 1 minute and 10 seconds left since this one takes 30 seconds to extract. Your running speed lets you go from one side to the other in about 30 seconds.
Conclusion
Melee-Only is a game mode that has a lot of skill involved. Like any normal raid, you never know what the enemy will do or how the raid will play out, but always keep in mind the different tips mentioned during this guide. On your next runs, they will surely be helpful and might get you to like and play this game mode consistently like I do.
Thank you for taking the time to read this guide!